
Photo by World Wildlife on StockSnap
It’s been 10 years(!) since I’ve written about my recommendation on how to scan all your documents onto your computer and index them using Evernote. Since then, Evernote has taken some business decisions, which have made them even less amenable to my workflow, which made me rethink my use of them.
Instead, I’ve written my own version, which I designed based on my workflow and other needs – it could import the private notebook from Evernote (which is an sqlite database), and port it to something more comfortable to backup (more details below).
I’ve written it in C#, which unfortunately meant it could only be run in Windows machines, and since my main computer is now a Mac (the Windows machine is my wife’s main computer) – it used it less and less, and with all the Windows upgrades – it slowly broke…
Instead of fixing it, I chose to re-write it (again), but this time I elected to use NodeJS+React, which results in a beautiful web application I can run locally (or remotely on my NAS, for example), and I want to share with you how my workflow works with this application
Setup sorting with paperless.node
Like Evernote, there is little setup needed before you can start to tag your files.
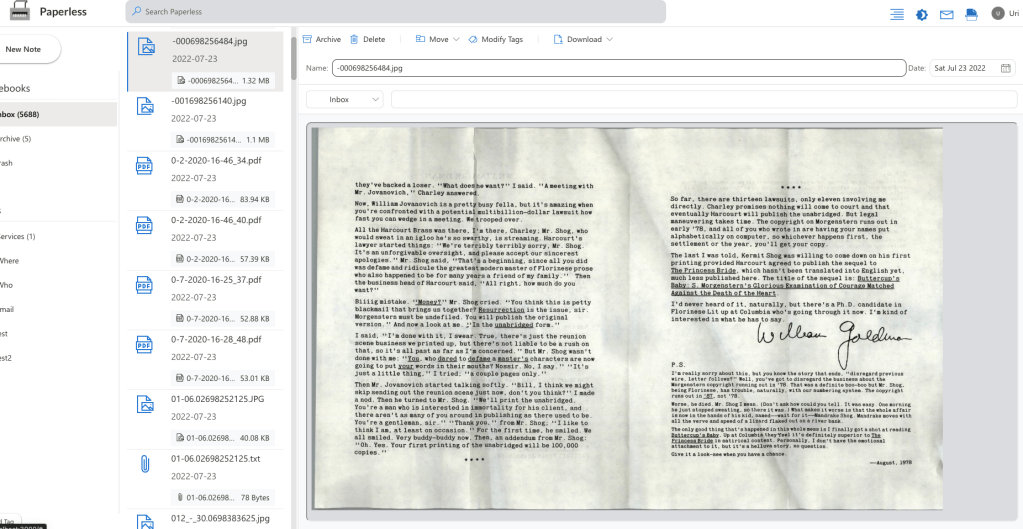
Assuming you have completed Step 1 of the paperless process, you should now have a folder full of scanned documents. Paperless.node has an integration with scanner, which means it can “watch” a folder on your disk, and import the files in it into notes. This means you can configure it to listen to the folder you already curated, and it would do the rest – adding each of the files as a note, and inserting it to the (aptly named) Inbox folder.
It might take a few minutes, but after that, you should have an Inbox-full of the documents you have scanned.
Sorting
Now you can start processing the files one by one. If a document should consist of more than one file – multi-select them, which will let you merge them together to a single note. Be aware that the first note in the aggregated list is the active note, meaning – the one you selected last. If you merged too many items by mistake – you can always “Split” the note back to its constituents, and merge them again the right way.
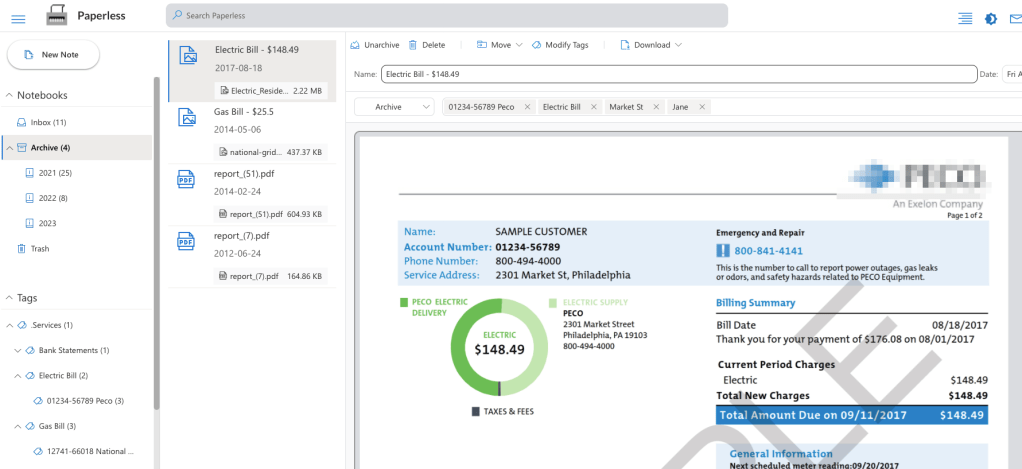
Give every note a title, set its tag(s) and creation date (see below).
After a note is done – press “Archive” – and it will be moved to the Archive Notebook.
This process is long, and will definitely take more than one sitting. But this is not a big issue, because when you get tired of it, you can simply quit, and pick it up next time exactly where you left off.
I made a habit of processing 10 notes a day, and as the work progressed, I did it to clear my mind, instead of playing Candy Crush… 
Note Title
Give each note a succinct title. You can copy the title from the document itself (if it is self-describing – some of the mail you get has very vague titles…).
Paperless.node lets you search by note title, so if you try to find this note, the title is where specific anchor words should be.
As this is mostly for archiving, Paperless.node doesn’t let you add any text in the note itself. If you want to add keywords to let you search by – that is what Tags are for.
Note Tags
This is where Paperless.node relied on Evernote’s tag design, as it is where it really shone. You can add as many tags as you want to every note. Tags can be any text you wish, and Paperless.node will help you re-use existing tags.
Tags can then be used to filter data – clicking on a tag in the Tag View will filter out all notes that do not include that specific tag.
For each note, ask yourself – does it belong to a specific person in the house? does it come from a certain vendor? does it belong in a certain category (‘Bills’, ‘Contract’, ‘Warranty’, etc.)?
Each of those is a tag.
I also recommend having specific tags for specific accounts, namely insurance policies, funds, and savings. For each use the account number as the tag, and then you can easily monitor each account over time.
Organizing Tags
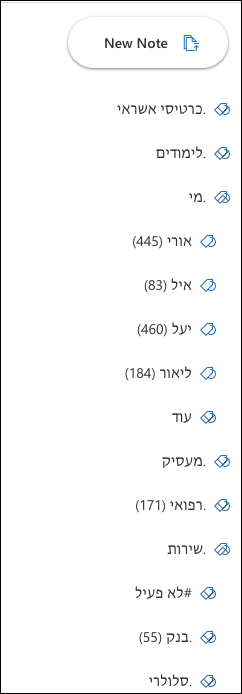
After using note tagging for your archived documents for awhile, you will start to see a proliferation of tags, which will get less and less helpful.
Which is why I added the capability to group Tags in the tag view!
To achieve that all you have to do is right-click the tag you want to be the child tag, and select “Update…” – then you can choose which tag you want to use as its parent.
This does not change the tags in any way – neither the group tag nor the grouped tags have any special features – they are all simply tags, but visually it is easier to follow which tags you have.
Suddenly, you will start seeing and understanding things you haven’t before, and archiving will start paying off. For example – that’s how I noticed that my son had two private health insurances!
My tip is to prefix group tags with ‘.’, meaning that if you would like to group all your past employers under one tag, name the parent tag ‘.Employer’. This ensures that group tags will appear first on your tag list, before all the incidental tags.
Note Creation Time
Archived documents have more benefit in their temporal context. You could have a tag for every year and add a ‘2020’ tag to every note containing a document from 2020, but there is a cooler approach.
Paperless allows you to edit the note creation time!
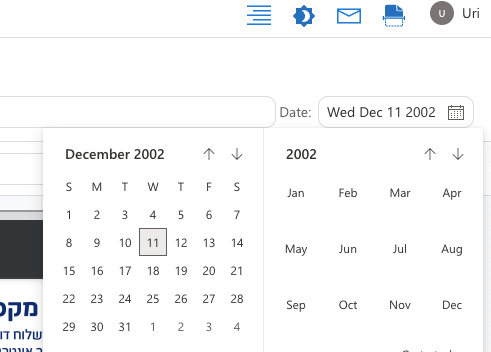
This means that for every document you can set its Creation Date to the actual date this document was produced!
The Archive document automatically sorts all notes by their creation date, and you can see your paper trail as it happened! How cool is that?
Using this trick might make your document processing less comfortable if your documents are sorted by creation time, as every new note is created on top, and then ‘jumps’ to the middle as you change its creation time. For that reason, the Inbox notebook is sorted by Update Time instead.
Documents Going Forward
So now all your historical documents are scanned and sorted on your Paperless.node application. But documents keep on coming by mail every day!
Here we’re back to the mobile phone apps such as Cam Scanner, which allows you to snap pictures of documents and, knowing that it is a picture of a document, apply image processing that is applicable to a document. Paperless.node allows you to integrate with gmail, which allows you to send new documents via gmail to be imported straight to the application!
If you feel really committed, you can opt to buy a dedicated scanner (you don’t need an industrial one anymore – how much mail do you get?) for a couple of hundred dollars.
Scan your mail as soon as you get it and throw it away (or better yet – shred it).
Add it to your Paperless.node Inbox (or use its scanner integration), and tag it. You don’t need to change the creation date anymore – the current date is your creation date!
Now you can forget about it
Backup
I did not include in the Paperless.node app any inherent backup procedure, as I was not interested in competing with several services which do it much better than I could.
I did, however, design the database to be more friendly to backup services compared to Evernote’s database design – instead of a gigantic blob, containing both metadata and files, which can easily inflate to over Giga of data – my database stores only the metadata in the sqlite file (title, tags, notebooks, etc.), and the actual files are kept in a subdirectory. Since attachments are mostly static – changes to the database won’t require re-uploading them every time (only when they are initially added to the database), and the metadata itself, even after 10 years and thousands of notes – is about 10Mb in size.
In my original post I’ve suggested using SpiderOak, TrueCrypt over Google Drive and CrashPlan backup, most which are still valid (CrashPlan moved away from the consumer market, so I had to drop that solution ☹️).
Currently I’m using my Synology NAS for my backup, using “Glacier Backup” and “Hyper Backup” for backing it up to Google’s GCS and Amazon’s S3-Glacier in an encrypted way, which costs about a $1 monthly…
Conclusion
I’m very proud of the application I wrote over a few weekends, and I encourage you to try it out! I would love your feedback, your input, and your contributions in case you think you can enhance the current experience!
